Join us at the 2025 Microsoft Fabric Community Conference
March 31 - April 2, 2025, in Las Vegas, Nevada. Use code MSCUST for a $150 discount! Early bird discount ends December 31.
Register NowBe one of the first to start using Fabric Databases. View on-demand sessions with database experts and the Microsoft product team to learn just how easy it is to get started. Watch now
- Microsoft Fabric Community
- Fabric community blogs
- Power BI Community Blog
- [PowerQuery] Tips to reduce steps in query editor
- Subscribe to RSS Feed
- Mark as New
- Mark as Read
- Bookmark
- Subscribe
- Printer Friendly Page
- Report Inappropriate Content
- Subscribe to RSS Feed
- Mark as New
- Mark as Read
- Bookmark
- Subscribe
- Printer Friendly Page
- Report Inappropriate Content
Why reduce steps of our power query?
The first thing we are going to talk about before seeing the tips is to understand why this action is necessary. The answer is focused on two benefits with equal importance.
- Performance: although it may be absurd to improve speed because at the apply a single script is generated and at the end of the day it would execute the same functions, the fact of not having them consolidated in the same steps can generate worse performance. Like any other query language e.g. SQL, the response time depends on how the query logic generated. We can measure it or watch it in the following video: https://www.youtube.com/watch?v=2bzJFrJPg_c
- Maintenance: an issue that is left aside a lot and is brutally important is maintenance. Generating a minimum of concrete steps exponentially helps the ease of reading an ETL. Imagine that having to read 15 "Change Data Type" to find the error in a column that no longer exists would be more complex than if we only had a single step "Change Data Type". Not only to execute actions but also to understand what the engine is doing at a glance.
Now that we know the importance of reducing steps of the query editor, let's look at some examples. It should be admitted that 80% of cases of excessive steps occur for two reasons. On the one hand the "rename" of our columns and on the other the "change type of data" of our columns. Those two are usually the ones that introduce the most garbage in the editor. One way to avoid this is to think about the logic of the query first and then execute steps instead of clicking on everything we can think of.
IMPORTANT: The key to getting into a column reduction habit is to have the formula bar ALWAYS visible in the query editor.
Change data type
This step should only apply if our engine does not have differentiated type and if possible only once. There are engines, such as databases, that will import the data already differentiated avoiding the step. But there are others that will not and it is important that each column is with its data type. Let's start by avoiding the autogeneration of this step by PowerBi so that it does not generate the step automatically because otherwise it executes it at the beginning and after actions such as "Split Column". This can be disabled in the desktop configuration as shown in the following image:
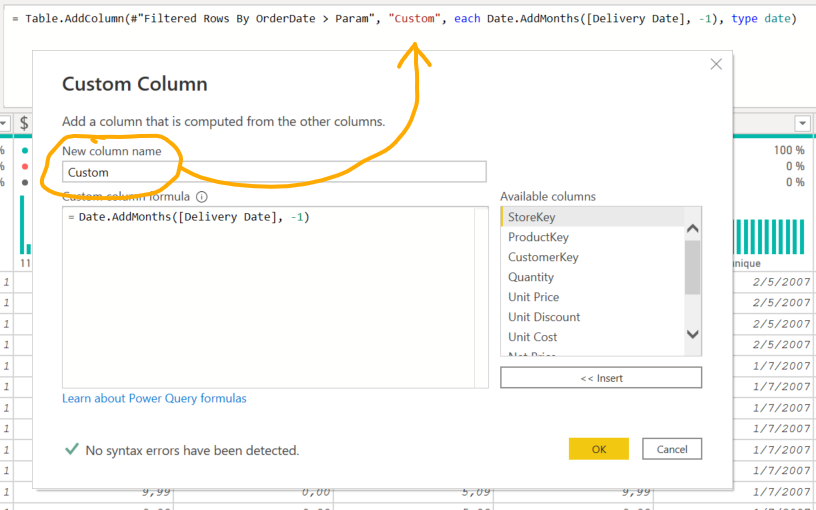
One of the classic needs of converting data types is after generating an add custom column. After adding a custom column, the engine usually assigns the data type "Any ABC123". The important thing is to pay attention to what our function does to find these tips. Let's see the example from a column date we want a columns with the previous month:
Notice that when interpreting the code the description of our function indicates that there is a parameter that we do not use. The last parameter specifies "columnType as nullable". When we create a custom column we can adjust the data type. We could specify that it is type date as follows
Rename columns
The need to maintain a good semantic layer understandable to our users usually leads us to rename our columns a lot. Like the rate change I will say that this step should ideally be executed once or none.
Next the previous logic we will pay attention to the code of the functions to find that the functions usually demand the name of the column after a transformation which would prevent us from generating new steps of "Rename Columns". Let's look at some examples:
By adding a custom column I can change the name, but if I forget I can see in the code where I change it
Similar to the previous one of a new custom column, most actions under the "Add Column" tab usually have a way to change their name. An example of auto-generated steps such as a two-column "Subtraction":
As we can see there we could quietly replace in the code the text "Substraction" that was generated automatically by the desired name instead of generating a new step.
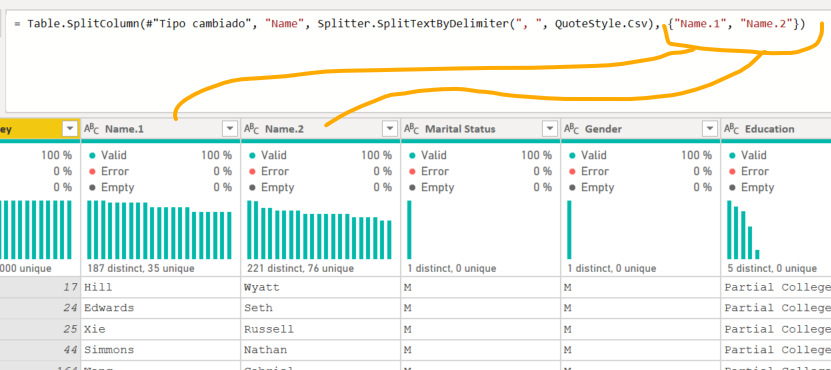
A classic example to rename is splitting columns by delimiter. for example if you want to split my name column that is in the format "last name,first name" into two columns the step will look like this
In the code we see again that at the end it indicates the name that the columns will have after dividing the original "Name". There you could replace Name.1 with Last Name and Name.2 with First Name.
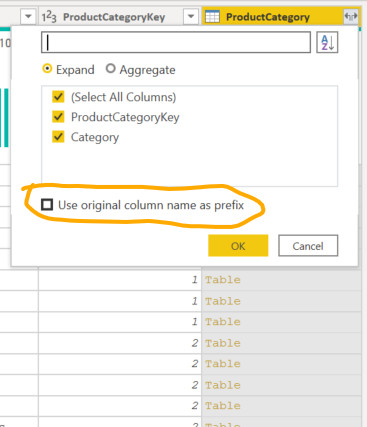
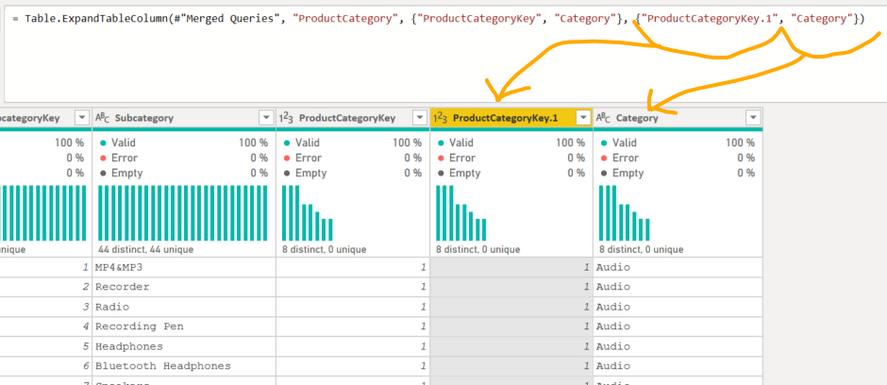
As there are many more, I close the "rename" with another classic that would be "Expand records". When we link tables, we read APIs, etc. It often happens that we have to expand records. The expansion step has two important details. On the one hand choose if we want to keep the name of the table / record as a prefix and as always at the end of the Power Query code we will see the names that would be given to a column if we want to change them.
Already beforehand ask us for the prefix. If we did not realize we could also change it as in the "split example":
Reorder columns
There are completely unnecessary steps that do not add value to our final query but do take away performance. This is the case with reordering columns. This action is merely aesthetic and only valid for work in the query editor since once applied and closed the Power Bi editor will put them in alphabetical order in our view of dragging fields. Unless we have operations that are very difficult to understand if we don't have the fields close to each other, this operation ends up being a performance cost for the query.
Use first row header
Reading the structure of the functions we use can help in many ways as we could see in the change of data type. Another option that can help us is to use the first row of data as a header (Promote Headers). When we connect to Excel it usually happens that the engine adds a row to recognize the headers. If the connection is to an xlsx file we can avoid that step since the Excel.Workbook function has a parameter to read them. How did we know? reading the function. Let's see the following image:
We could change that null to true so that the result of clicking the desired Sheet or Table already incorporates the first row as Headers without having to create another step.
Regroup same type of steps
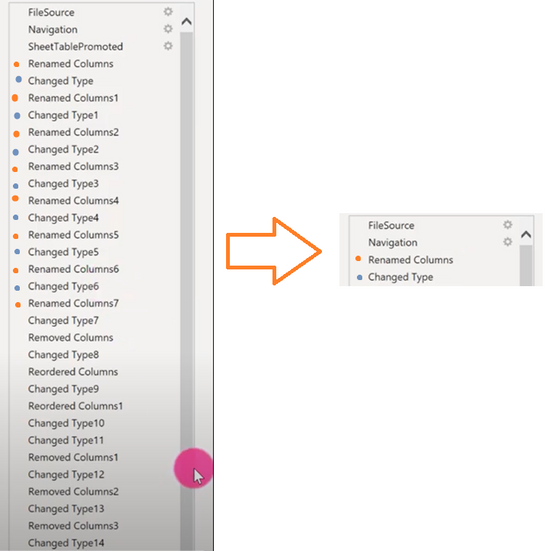
Before starting to click by going column by column, it is necessary to analyze the entire table and think about the logic we want to implement. That way we concentrate on performing a common action for the entire table and not repeating steps column by column. It may seem the same for someone who is not used to going column by column renaming and changing the type, but it would be best to do the same type of step for all columns once since it would cause them to accumulate in the code instead of generating many steps in order to move from the image on the left to the right.
If we first (or last) made all the rename, the code would be like this:
We could even directly edit the code if we wanted to. Same case for the data type the code would look like this
If we do not want to enter the code, we already perform the renaming and after working for a while we remember that we forgot a column rename. We can avoid the generation of ANOTHER step if we go to that renamed step with one click. If we execute the same step as the selected step, the power query engine will ask if we want to create a new step or generate the code within it.
This could be applied to different types of steps such as "Filter rows". We could filter rows by different column conditions in the same step instead of having several steps that filter rows.
Other possibilities
Along with these tips I'm sure there are many more. The more we know the M language, the more tips we will know and we could reach more complex solutions. For example, if we want to extract the name of the month from a column "Period" with the format "2022-05" it would be enough to create a new column converting that period into a date and extracting the expected format:
Date.ToText(
    Date.From([Period]), "MMMM"
)
That way it was not necessary to duplicate period to convert it to date to be able to extract the name of the month.
NOTE: Remember that if we have the possibility to execute a native query to the data source, we could reduce our query. For example, filtering rows with a SQL WHERE instead of generating several steps.
I hope this helps you reduce the steps of your querys so that they are maintainable in the future. What about you? What tips do you have to reduce steps in the query editor?
Original post in spanish from ladataweb: https://blog.ladataweb.com.ar/post/689587368847671296/powerquery-tips-para-reducir-pasos-en-editor-d...
You must be a registered user to add a comment. If you've already registered, sign in. Otherwise, register and sign in.
- Boosting Sales and Customer Satisfaction: The Powe...
- SVG based Power BI Semantic Model Columns and Meas...
- Manage Large Datasets More Efficiently with Power ...
- Microsoft Power BI vs Microsoft Fabric
- Working with X-Functions in DAX (SUMX, AVERAGEX, e...
- Introducing the new text slicer in Power BI
- Explore Small Multiples for the New Card Visual in...
- Mastering Dynamic Stock Management with Cumulative...
- Data lineage in DAX
- Experimental Custom Pie Chart in Power BI
- Miraligafarli04 on: Boosting Sales and Customer Satisfaction: The Powe...
- Zainul0101 on: Microsoft Power BI vs Microsoft Fabric
-
kkishba2
 on:
Introducing the new text slicer in Power BI
-
saud968
 on:
Explore Small Multiples for the New Card Visual in...
- Nazrin on: Mastering Dynamic Stock Management with Cumulative...
-
 Icaro_Bonfim
on:
Power BI Export All Visuals - python notebook
- phwiest on: Exploring Hierarchical Directories in Power BI: A ...
- lilin2020 on: 🎉 FabCon is Back! 🎉
-
kevingauv
 on:
Unlocking the Power of Power BI Goals (Metrics): A...
-
 Dangar332
on:
PowerBI - Custom Sort
-
How to
623 -
Tips & Tricks
587 -
Support insights
121 -
Events
109 -
Opinion
73 -
DAX
66 -
Power BI
65 -
Power Query
62 -
Power BI Dev Camp
45 -
Power BI Desktop
40 -
Roundup
35 -
Power BI Embedded
20 -
Time Intelligence
19 -
Tips&Tricks
18 -
PowerBI REST API
12 -
Featured User Group Leader
11 -
Power BI Service
8 -
Power Query Tips & Tricks
8 -
finance
8 -
Direct Query
7 -
Power BI REST API
6 -
Dataflow
6 -
Auto ML
6 -
financial reporting
6 -
Data Analysis
6 -
Power Automate
6 -
Data Visualization
6 -
Python
6 -
Income Statement
5 -
Dax studio
5 -
powerbi
5 -
service
5 -
Power BI PowerShell
5 -
Machine Learning
5 -
Paginated Reports
4 -
External tool
4 -
Power BI Goals
4 -
PowerShell
4 -
Desktop
4 -
Bookmarks
4 -
Line chart
4 -
Group By
4 -
community
4 -
RLS
4 -
M language
4 -
Visuals
3 -
SQL Server 2017 Express Edition
3 -
R script
3 -
Aggregation
3 -
calendar
3 -
Gateways
3 -
R
3 -
M Query
3 -
Webinar
3 -
CALCULATE
3 -
R visual
3 -
Reports
3 -
PowerApps
3 -
Data Science
3 -
Azure
3 -
Data model
3 -
Conditional Formatting
3 -
Visualisation
3 -
Administration
3 -
M code
3 -
PUG
2 -
Custom Measures
2 -
Filtering
2 -
Row and column conversion
2 -
Python script
2 -
Nulls
2 -
DVW Analytics
2 -
parameter
2 -
Data Protection
2 -
Industrial App Store
2 -
Week
2 -
Date duration
2 -
Formatting
2 -
Weekday Calendar
2 -
Support insights.
2 -
construct list
2 -
slicers
2 -
SAP
2 -
Power Platform
2 -
Workday
2 -
external tools
2 -
index
2 -
RANKX
2 -
PBI Desktop
2 -
Date Dimension
2 -
Integer
2 -
Visualization
2 -
Power BI Challenge
2 -
Query Parameter
2 -
Date
2 -
SharePoint
2 -
Power BI Installation and Updates
2 -
How Things Work
2 -
Tabular Editor
2 -
rank
2 -
ladataweb
2 -
Troubleshooting
2 -
Date DIFF
2 -
Transform data
2 -
Tips and Tricks
2 -
Incremental Refresh
2 -
Number Ranges
2 -
Query Plans
2 -
Power BI & Power Apps
2 -
Random numbers
2 -
Day of the Week
2 -
Custom Visual
2 -
VLOOKUP
2 -
pivot
2 -
calculated column
2 -
M
2 -
hierarchies
2 -
Power BI Anniversary
2 -
Language M
2 -
inexact
2 -
Date Comparison
2 -
Power BI Premium Per user
2 -
Forecasting
2 -
REST API
2 -
Editor
2 -
Split
2 -
measure
2 -
Microsoft-flow
2 -
Paginated Report Builder
2 -
Working with Non Standatd Periods
2 -
powerbi.tips
2 -
Custom function
2 -
Reverse
2 -
Power Pivot
1 -
Quick Tips
1 -
data
1 -
PBIRS
1 -
Usage Metrics in Power BI
1 -
Multivalued column
1 -
Pipeline
1 -
Path
1 -
Yokogawa
1 -
Dynamic calculation
1 -
Data Wrangling
1 -
native folded query
1 -
transform table
1 -
UX
1 -
Cell content
1 -
General Ledger
1 -
Thursday
1 -
Table
1 -
Natural Query Language
1 -
Infographic
1 -
automation
1 -
Prediction
1 -
newworkspacepowerbi
1 -
Performance KPIs
1 -
HR Analytics
1 -
keepfilters
1 -
Connect Data
1 -
Financial Year
1 -
Schneider
1 -
dynamically delete records
1 -
Copy Measures
1 -
Friday
1 -
Q&A
1 -
Event
1 -
Custom Visuals
1 -
Free vs Pro
1 -
Format
1 -
Active Employee
1 -
Custom Date Range on Date Slicer
1 -
refresh error
1 -
PAS
1 -
certain duration
1 -
DA-100
1 -
bulk renaming of columns
1 -
Single Date Picker
1 -
Monday
1 -
PCS
1 -
Saturday
1 -
update
1 -
Slicer
1 -
Visual
1 -
forecast
1 -
Regression
1 -
CICD
1 -
Current Employees
1 -
date hierarchy
1 -
relationship
1 -
SIEMENS
1 -
Multiple Currency
1 -
Power BI Premium
1 -
On-premises data gateway
1 -
Binary
1 -
Power BI Connector for SAP
1 -
Sunday
1 -
Training
1 -
Announcement
1 -
Features
1 -
domain
1 -
pbiviz
1 -
sport statistics
1 -
Intelligent Plant
1 -
Circular dependency
1 -
GE
1 -
Exchange rate
1 -
Dendrogram
1 -
range of values
1 -
activity log
1 -
Decimal
1 -
Charticulator Challenge
1 -
Field parameters
1 -
deployment
1 -
ssrs traffic light indicators
1 -
SQL
1 -
trick
1 -
Scripts
1 -
Color Map
1 -
Industrial
1 -
Weekday
1 -
Working Date
1 -
Space Issue
1 -
Emerson
1 -
Date Table
1 -
Cluster Analysis
1 -
Stacked Area Chart
1 -
union tables
1 -
Number
1 -
Start of Week
1 -
Tips& Tricks
1 -
Workspace
1 -
Theme Colours
1 -
Text
1 -
Flow
1 -
Publish to Web
1 -
Extract
1 -
Topper Color On Map
1 -
Historians
1 -
context transition
1 -
Custom textbox
1 -
OPC
1 -
Zabbix
1 -
Label: DAX
1 -
Business Analysis
1 -
Supporting Insight
1 -
rank value
1 -
Synapse
1 -
End of Week
1 -
Tips&Trick
1 -
Showcase
1 -
custom connector
1 -
Waterfall Chart
1 -
Power BI On-Premise Data Gateway
1 -
patch
1 -
Top Category Color
1 -
A&E data
1 -
Previous Order
1 -
Substring
1 -
Wonderware
1 -
Power M
1 -
Format DAX
1 -
Custom functions
1 -
accumulative
1 -
DAX&Power Query
1 -
Premium Per User
1 -
GENERATESERIES
1 -
Report Server
1 -
Audit Logs
1 -
analytics pane
1 -
step by step
1 -
Top Brand Color on Map
1 -
Tutorial
1 -
Previous Date
1 -
XMLA End point
1 -
color reference
1 -
Date Time
1 -
Marker
1 -
Lineage
1 -
CSV file
1 -
conditional accumulative
1 -
Matrix Subtotal
1 -
Check
1 -
null value
1 -
Excel
1 -
Cumulative Totals
1 -
Report Theme
1 -
Bookmarking
1 -
oracle
1 -
mahak
1 -
pandas
1 -
Networkdays
1 -
Button
1 -
Dataset list
1 -
Keyboard Shortcuts
1 -
Fill Function
1 -
LOOKUPVALUE()
1 -
Tips &Tricks
1 -
Plotly package
1 -
refresh M language Python script Support Insights
1 -
Sameperiodlastyear
1 -
Office Theme
1 -
matrix
1 -
bar chart
1 -
Measures
1 -
powerbi argentina
1 -
Canvas Apps
1 -
total
1 -
Filter context
1 -
Difference between two dates
1 -
get data
1 -
OSI
1 -
Query format convert
1 -
ETL
1 -
Json files
1 -
Merge Rows
1 -
CONCATENATEX()
1 -
take over Datasets;
1 -
Networkdays.Intl
1 -
Get row and column totals
1 -
Governance
1 -
Fun
1 -
Power BI gateway
1 -
gateway
1 -
Elementary
1 -
Custom filters
1 -
Vertipaq Analyzer
1 -
powerbi cordoba
1 -
Model Driven Apps
1 -
REMOVEFILTERS
1 -
XMLA endpoint
1 -
translations
1 -
OSI pi
1 -
Parquet
1 -
Change rows to columns
1 -
remove spaces
1 -
Azure AAD
1 -
Retail
1 -
Power BI Report Server
1 -
School
1 -
Cost-Benefit Analysis
1 -
DIisconnected Tables
1 -
Sandbox
1 -
Honeywell
1 -
Combine queries
1 -
X axis at different granularity
1 -
ADLS
1 -
Primary Key
1 -
Microsoft 365 usage analytics data
1 -
Randomly filter
1 -
Week of the Day
1 -
Get latest sign-in data for each user
1 -
query
1 -
Dynamic Visuals
1 -
KPI
1 -
Intro
1 -
Icons
1 -
ISV
1 -
Ties
1 -
unpivot
1 -
Practice Model
1 -
Continuous streak
1 -
ProcessVue
1 -
Create function
1 -
Table.Schema
1 -
Acknowledging
1 -
Postman
1 -
Text.ContainsAny
1 -
Power BI Show
1 -
API
1 -
Kingsley
1 -
Merge
1 -
variable
1 -
Issues
1 -
function
1 -
stacked column chart
1 -
ho
1 -
ABB
1 -
KNN algorithm
1 -
List.Zip
1 -
optimization
1 -
Artificial Intelligence
1 -
Map Visual
1 -
Text.ContainsAll
1 -
Tuesday
1 -
help
1 -
group
1 -
Scorecard
1 -
Json
1 -
Tops
1 -
financial reporting hierarchies RLS
1 -
Featured Data Stories
1 -
MQTT
1 -
Custom Periods
1 -
Partial group
1 -
Reduce Size
1 -
FBL3N
1 -
Wednesday
1


